Hello!
yes, it's me. It has been some time since my last post. Busy life, busy at work, and technical difficulties all lead to the absence of posts. I have been posting on my Facebook page and Instagram on a fairly regular basis but I went silent here on the blog.
I have still been making as time allows and will share here as soon as my hubby and I get a few kinks worked out with our laptop and sharing our files.
Hope you are all enjoying your Autumn and are looking forward to some spooky fun at Halloween!
Happy Creating!
Hugs, Sharon
Saturday, October 27, 2018
Sunday, March 5, 2017
Distress Oxide Play
Hello,
happy March! The trees and bulbs are starting to bloom which a sure sign Spring is on its way. While it is still cold and rainy in Northern California I'm having fun playing with my new Distress Oxide inks from Tim Holtz and Ranger Ink.
If you are a fan of Tim Holtz or Ranger I'm sure you have seen the release of these new inks. They are a hybrid ink fusion between a dye and pigment ink. All the fun properties of the original Distress with a new twist. There are lots of you out there playing and sharing the results so this is my contribution to the experimentation and play!
There are 12 colors of Distress Oxide. We have Worn Lipstick, Fired Brick, Spiced Marmalade, Fossilized Amber, Peeled Paint, Cracked Pistachio, Broken China, Iced Spruce, Faded Jeans, Wilted Violet, Vintage Photo and Walnut Stain. Check out the Ranger Ink site here for more information.
I have four colors so far - Cracked Pistachio, Broken China, Wilted Violet and Vintage Photo. And yes, I will be getting the rest.
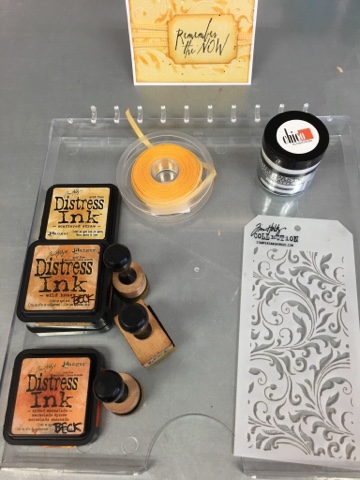
The pop of color I got by stamping and embossing is nothing short of amazing! The text paper was colored using Tim's wrinkle free distress technique and then stamping with the Vintage photo Distress Oxide. Using a blending tool I added more Distress Oxide inks to the embossed panels and sprayed with water to get that chalky, oxidized finish. Yum!


happy March! The trees and bulbs are starting to bloom which a sure sign Spring is on its way. While it is still cold and rainy in Northern California I'm having fun playing with my new Distress Oxide inks from Tim Holtz and Ranger Ink.
If you are a fan of Tim Holtz or Ranger I'm sure you have seen the release of these new inks. They are a hybrid ink fusion between a dye and pigment ink. All the fun properties of the original Distress with a new twist. There are lots of you out there playing and sharing the results so this is my contribution to the experimentation and play!
There are 12 colors of Distress Oxide. We have Worn Lipstick, Fired Brick, Spiced Marmalade, Fossilized Amber, Peeled Paint, Cracked Pistachio, Broken China, Iced Spruce, Faded Jeans, Wilted Violet, Vintage Photo and Walnut Stain. Check out the Ranger Ink site here for more information.
I have four colors so far - Cracked Pistachio, Broken China, Wilted Violet and Vintage Photo. And yes, I will be getting the rest.
The pop of color I got by stamping and embossing is nothing short of amazing! The text paper was colored using Tim's wrinkle free distress technique and then stamping with the Vintage photo Distress Oxide. Using a blending tool I added more Distress Oxide inks to the embossed panels and sprayed with water to get that chalky, oxidized finish. Yum!


On these cards I stamped a focal image with Distress Oxide ink and then spritzed with water. Once dry I used regular Distress inks to color the background. Thanks to my friend Terri for letting me play with some of her Distress Oxide colors!!!


Looking forward to getting the rest of the colors and having more PLAY time!
Up for your own Distress Oxide play day? For all of you Chico crafters there will be a class at Chico Scrapbooks in late March or early April. Contact Jodie at Chico Scrapbooks at 530-526-0688 to sign up. The class includes the purchase of six or all twelve of the new Distress Oxide inks, a guided play session to explore the inks, and then creation of cards like the ones pictured here.
Thanks for stopping by today! Hope your year is going well so far and you are taking time for crafty play time. See you next time.
Happy Creating!
Hugs, Sharon
Monday, January 16, 2017
Good Morning-Update
Good Morning,
It's January 2017. Its the middle of the month and I haven't popped in to wish you a happy new year. Hope your 2017 has gotten off to a good start. Thank you for your support and stopping by.
I am happy and excited to say that I'm once again going to the craft industry trade show put on by the Craft and Hobby Association. This year it is called Creativation and it's going to be in Phoenix, AZ staring later this week. Yippee! Getting so excited I can hardly concentrate on anything else.
I will do my best to post regular updates on Facebook and, Instagram. You can find me on FB at SY's Studio and on Instagram at sharony62.
If you are a follower of this blog and check in on a regular basis you may have noticed fewer posts. Not for lack of trying on my part. I am having technical difficulties, Hehehehe. I normally post from my iPad from he comfort of my couch. My Blogger app has stopped working and I can no longer upload photos from my mobile devices. Hmmmmmm. I will get this resolved or start posting from my desktop computer. After I get back I will sort this all out.
In the meantime, be sure to follow me on Facebook and Instagram to get my updates on Creativation. Facebook is SY's Studio and Instagram is sharony62.
Have a wonderful week.
Happy Creating!
Hugs, Sharon
Saturday, November 26, 2016
Christmas Cards and More 2016
Hello! How are you? I have been MIA from the blog. Due to life running at a fast pace and technical difficulties with Blogger on my mobile devices I have not posted in a while. Thankfully I am still able to post from my Mac. Just not quite as convenient as blogging while lounging on the couch, ha, ha, ha.
Fall projects are put away for the year and I have started on Christmas/Winter projects.
I warmed up with a set of Christmas cards for my MIL. Using a variety of older Christmas paper lines I made cards without a lot of dimension so that they can easily be mailed. These come together quickly as I keep them simple by layering with the designer paper, using sentiments from the paper with a few added stamped sentiments and some embellishments. Love the traditional red and greens.


My current work in progress is another two sets of the wood block home decor that I created for Fall/Halloween. One set is a gift (shhhh, don't tell) and the other is a Winter/Christmas set. These are made in a similar manner with a good coat of black gesso to start and then some Ranger Ink transparent texture paste through stencils. Here is what I have so far.


Next step is several coats of Distress paint applied and blended with a baby wipe.


I will post when these are complete with more details on supplies and materials.
Hope your December is magical and you spend time with those you love.
Happy Creating! Hugs, Sharon
Saturday, September 17, 2016
Wood Block Halloween/Fall Home Decor
Hello!


Hope you are having an enjoyable day. With the first day of Fall in less than a week I wanted to share a home decor project that will take you through fall, Halloween , and into Thanksgiving. Love a home decor piece that is versatile, don't you?
This piece, really pieces, was left over from another project. Some 2 x 4 pieces already cut into 4, 5, and 6 inch high pieces. No stepped out photos on this one but I will walk you through the steps and list all the materials at the bottom of this post.
As is my usual method I didn't have a specific end result in my mind but knew I wanted a Halloween decor piece. Out came the Halloween colors, stamps and dies. I ended up with this group of Halloween blocks.
Fun, right? I started by painting the blocks all over with black gesso.
Once dry I applied some Ranger Texture Paste Transparent Matte through a spider web stencil. I let the paste air dry and then pulled out some Tim Holtz Distress paints in oranges. I dabbed on and blended with a baby wipe. This was repeated until I was happy with the color. I applied this color to all sides except the bottom. A happy surprise is how the matte paste makes the wood look like it carved! Next I die cut a variety of Halloween images and words. Some shading was added with Distress inks. The die cuts were glued down with Ranger Matte Medium. Some were given extra texture with some crackle paint. The final touch was some stamping of spiders and script on the sides and back. To protect the blocks I added a layer of matte medium over the whole surfaces.
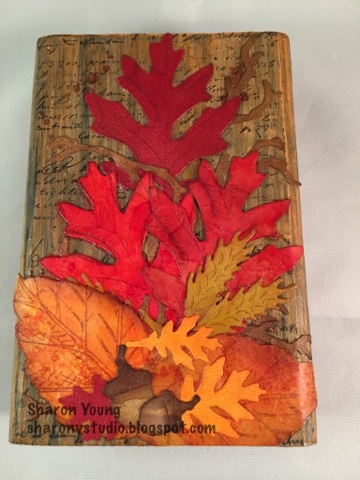
It was at this point that I realized that I could add more die cuts on the back side! Thus the Fall side of my blocks were born. I started the process again with some Fall themed dies, stamps, and inks. Side two turned out like this.
I did not include the "wood carving" on this side but instead used the same script stamp as used on the sides for the background. I followed the same process to color and glue on the Fall leaves and foliage die cuts. Again, the final layer was matte medium to seal everything up to protect and provide long wear.
I will display these blocks on a shelf in my great room on the Fall side. Some time in October I will flip them to the Halloween side. After October 31st I will flip them back to the Fall side and display through Thanksgiving. Three little blocks will cover the months of the Fall and Autumn holiday season.
Hmmmm, now I'm thinking it would be fun to have a set of blocks for each season! Winter/Christmas, Spring/Easter, and Summer/4th of July. I've got the pastes, paints, inks and die cuts so now all I need is hubby to help me cut up some 2 x 4s!
Hope this inspires you to look at scrap wood in a whole new way!
Supplies used:
Surface: Scrap wood 2 x 4
Wet: Distress paints, and inks in oranges, reds, yellows and browns; archival ink, black gesso, Ranger Matte Medium, Ranger texture Paste Transparent Matte
Dies: Tim Holtz Sizzix Tattered Leaves, Layered Leaf, Jack O Lanterns, Halloween thinlit word, Branch Tree, Mini Owl & Crescent Moon Mini Movers and Shapers, Autumn Gathering Sizzlet; and an original Sizzix die Pumpkin (38-0254)
Stencil: Tim Holtz Stampers Anonymous Shatter
Stamps: Tim Holtz Stampers Anonymous Ledger Script and MiniHalloween 4
Thank You for stopping by! Happy Creating!
Hugs, Sharon
Saturday, August 20, 2016
Mixed Media Cards
Happy Saturday!


Hope all is well with you as summer winds down. Is anyone else looking forward to Fall as much as I am? Love these times of transition. It almost feels like an opportunity to reset and move on.
I have been enjoying creating and teaching some mixed media classes. Last weekend was a mixed media card class. If you are following on FB at SY's Studio you have already seen some peeks.
Here are the finished class samples.
At the students request I incorporated the favorite techniques from the Mixed Mediums 101 and 102 classes.
Kits ready for class.
Trays all set with mediums, inks, and supplies for each card.
Some close up details of all the mixed media goodness!
I get such a kick out of watching the students learn and have a fun time. So much so that I always forget to take pics during class. Ugh. No matter how much I tell myself I'm going to take pictures of the class and the students work I always forget. Hahahahaha. I just get lost in the moment and enjoy myself as much as they do. Ah well that's the way it goes.
Really, truly I get as much out of teaching as the students do learning. It feeds my soul and allows me to just be.
I'm starting some fall themed projects and will share some peeks later.
Thanks so much for stopping by. Hope the mixed media cards inspire you to create some of your own.
Happy Creating!
Hugs, Sharon
Monday, July 11, 2016
Village Dwellings, Sneak Peaks, and Halloween
Happy Monday!
hope you are doing well and enjoying your summer. I'm excited about the latest releases from Tim Holtz. How about you?
Today's Tim Holtz Sizzix holiday release sneak peek really brought me back a few years! Be sure to check out the Halloween Sizzix Release and the Christmas Sizzix Release and see all the fun new dies and embossing folders. There is sure to be something for everyone. The Village Dwelling series has been creating quite the buzz and Tim does not disappoint with the latest dwellings to add to our village. The Halloween Manor just makes me smile.

So many of Tim's dies and stamps have such a nostalgic feel to them. I am always drawn to the Halloween images and products. It brings back the wonderful memories from childhood. My Mom was so great at making every holiday festive and full of happy memories.
Tim's release, including the Manor, doesn't only take me back to childhood but just about 6 years ago when I re-ignited my passion for crafting. When I saw that Manor this afternoon I instantly went back to 2010 when I created my own Halloween manor. Hope you enjoy this little trip down memory lane. I know traditionally its throw back Thursday but I'm just a little early this week. Hehehehe.
I was using my Cricut more those days and can still remember the excitement when I found the Happy Hauntings cartridge. It included a haunted mansion to put together. What started out as simply putting together the haunted house became a multi day construction project of not only the house but a whole scene.
It looked good, It was a challenge to put together but I was loving how it turned out. It needs some some shingles my husband said. Hmmmmmm, I can do that.

Yes, it does look much better with shingles.

I glued each one of these on by hand, carefully making sure to stagger the rows.


hope you are doing well and enjoying your summer. I'm excited about the latest releases from Tim Holtz. How about you?
Today's Tim Holtz Sizzix holiday release sneak peek really brought me back a few years! Be sure to check out the Halloween Sizzix Release and the Christmas Sizzix Release and see all the fun new dies and embossing folders. There is sure to be something for everyone. The Village Dwelling series has been creating quite the buzz and Tim does not disappoint with the latest dwellings to add to our village. The Halloween Manor just makes me smile.

Tim's release, including the Manor, doesn't only take me back to childhood but just about 6 years ago when I re-ignited my passion for crafting. When I saw that Manor this afternoon I instantly went back to 2010 when I created my own Halloween manor. Hope you enjoy this little trip down memory lane. I know traditionally its throw back Thursday but I'm just a little early this week. Hehehehe.
I was using my Cricut more those days and can still remember the excitement when I found the Happy Hauntings cartridge. It included a haunted mansion to put together. What started out as simply putting together the haunted house became a multi day construction project of not only the house but a whole scene.
It looked good, It was a challenge to put together but I was loving how it turned out. It needs some some shingles my husband said. Hmmmmmm, I can do that.

Yes, it does look much better with shingles.


It needs more my husband said. Ok, what else can I add? How about rocks on the chimney, and a yard with spooky trees and a grave yard, and a fence.

Perhaps as a sign of mixed media things to come I got some texture paste and created the "yard" on a canvas and painted it all spooky with black and gray.

So today Tim Holtz has brought back some happy memories and struck a cord with his latest dwelling the spooky manor. I love how crafting can become so personal and take us to another place and time.
I am looking forward to creating the next version of my haunted house. Wonder what construction tips my husband will come up with this time?


Thanks so much for stopping by today. Hope you find joy in your crafting!
Happy Creating!
Hugs, Sharon
Subscribe to:
Posts (Atom)