Showing posts with label Sizzix. Show all posts

Saturday, September 17, 2016

Wood Block Halloween/Fall Home Decor

Hello!

Hope you are having an enjoyable day. With the first day of Fall in less than a week I wanted to share a home decor project that will take you through fall, Halloween , and into Thanksgiving. Love a home decor piece that is versatile, don't you?

This piece, really pieces, was left over from another project. Some 2 x 4 pieces already cut into 4, 5, and 6 inch high pieces. No stepped out photos on this one but I will walk you through the steps and list all the materials at the bottom of this post. 

As is my usual method I didn't have a specific end result in my mind but knew I wanted a Halloween decor piece.   Out came the Halloween colors, stamps and dies.  I ended up with this group of Halloween blocks. 


Fun, right?  I started by painting the blocks all over with black gesso. 


Once dry I applied some Ranger Texture Paste Transparent Matte through a spider web stencil.  I let the paste air dry and then pulled out some Tim Holtz Distress paints in oranges. I dabbed on and blended with a baby wipe. This was repeated until I was happy with the color. I applied this color to all sides except the bottom. A happy surprise is how the matte paste makes the wood look like it carved!  Next I die cut a variety of Halloween images and words. Some shading was added with Distress inks.  The die cuts were glued down with Ranger Matte Medium. Some were given extra texture with some crackle paint.  The final touch was some stamping of spiders and script on the sides and back.  To protect the blocks I added a layer of matte medium over the whole surfaces. 


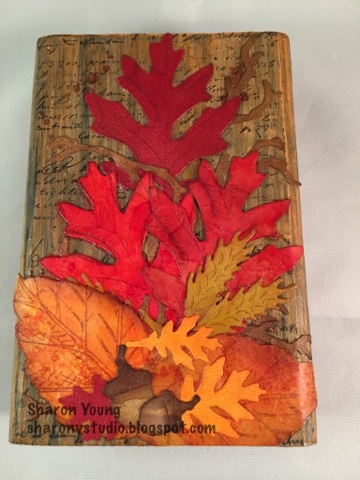
It was at this point that I realized that I could add more die cuts on the back side!  Thus the Fall side of my blocks were born. I started the process again with some Fall themed dies, stamps, and inks. Side two turned out like this. 


I did not include the "wood carving" on this side but instead used the same script stamp as used on the sides for the background.  I followed the same process to color and glue on the Fall leaves and foliage die cuts.   Again, the final layer was matte medium to seal everything up to protect and provide long wear. 


I will display these blocks on a shelf in my great room on the Fall side. Some time in October I will flip them to the Halloween side. After October 31st I will flip them back to the Fall side and display through Thanksgiving. Three little blocks will cover the months of the Fall and Autumn holiday season. 

Hmmmm, now I'm thinking it would be fun to have a set of blocks for each season!  Winter/Christmas, Spring/Easter, and Summer/4th of July.   I've got the pastes, paints, inks and die cuts so now all I need is hubby to help me cut up some 2 x 4s!  

Hope this inspires you to look at scrap wood in a whole new way!

Supplies used:

Surface:  Scrap wood 2 x 4

Wet:  Distress paints, and inks in oranges, reds, yellows and browns;  archival ink, black gesso, Ranger Matte Medium, Ranger texture Paste Transparent Matte

Dies:  Tim Holtz Sizzix Tattered Leaves, Layered Leaf, Jack O Lanterns, Halloween thinlit word, Branch Tree, Mini Owl & Crescent Moon Mini Movers and Shapers, Autumn Gathering Sizzlet; and an original Sizzix die Pumpkin (38-0254)

Stencil:  Tim Holtz Stampers Anonymous Shatter

Stamps:  Tim Holtz Stampers Anonymous Ledger Script and MiniHalloween 4

Thank You for stopping by!  Happy Creating!

Hugs, Sharon


Monday, July 11, 2016

Village Dwellings, Sneak Peaks, and Halloween

Happy Monday!

hope you are doing well and enjoying your summer.  I'm excited about the latest releases from Tim Holtz.  How about you?

Today's Tim Holtz Sizzix holiday release sneak peek really brought me back a few years!  Be sure to check out the Halloween Sizzix Release and the Christmas Sizzix Release and see all the fun new dies and embossing folders.  There is sure to be something for everyone.  The Village Dwelling series has been creating quite the buzz and Tim does not disappoint with the latest dwellings to add to our village.  The Halloween Manor just makes me smile.


So many of Tim's dies and stamps have such a nostalgic feel to them.  I am always drawn to the Halloween images and products.  It brings back the wonderful memories from childhood. My Mom was so great at making every holiday festive and full of happy memories.

Tim's release, including the Manor, doesn't only take me back to childhood but just about 6 years ago when I re-ignited my passion for crafting.  When I saw that Manor this afternoon I instantly went back to 2010 when I created my own Halloween manor.  Hope you enjoy this little trip down memory lane.  I know traditionally its throw back Thursday but I'm just a little early this week.  Hehehehe.

I was using my Cricut more those days and can still remember the excitement when I found the Happy Hauntings cartridge.  It included a haunted mansion to put together.  What started out as simply putting together the haunted house became a multi day construction project of not only the house but a whole scene.

It looked good,  It was a challenge to put together but I was loving how it turned out.  It needs some some shingles my husband said.   Hmmmmmm, I can do that.


Yes, it does look much better with shingles.


 I glued each one of these on by hand, carefully making sure to stagger the rows.


It needs more my husband said.  Ok, what else can I add?  How about rocks on the chimney, and a yard with spooky trees and a grave yard, and a fence.  


Perhaps as a sign of mixed media things to come I got some texture paste and created the "yard" on a canvas and painted it all spooky with black and gray.


So today Tim Holtz has brought back some happy memories and struck a cord with his latest dwelling the spooky manor.  I love how crafting can become so personal and take us to another place and time.  

I am looking forward to creating the next version of my haunted house.  Wonder what construction tips my husband will come up with this time?


Thanks so much for stopping by today.  Hope you find joy in your crafting!

Happy Creating!

Hugs, Sharon


Tuesday, January 19, 2016

CHA 2016 Favorite Tim Holtz Dies and Stamps

Hello!  Another review on CHA 2016. This time it's all about Tim Holtz dies and stamps. 

Sizzix is my die company of choice. I'm especially in love with steel rule dies as I can cut thick things like chipboard, fabric, metal, and other media.  Chipboard people!  

Here are a few new things that caught my eye. 

Tim Holtz will be releasing some more steampunk inspired dies. Yay!  A Bigz to coordinate with the original gear and a thinlets with tons of sizes and a cool corner piece. 


Some new dwellings to expand our village.  Check out these dwellings created by the talented Annette Green. 


Clever die to create textured roofs. Oh the possibilities  


The new Tim Holtz release by Stamper Anonymous does not disappoint. The steampunk theme continues along with some botanicals, smaller crazy birds, and some crazy cats. Looking forward to the set of cars for masculine pages and cards. 


I'm also excited about the release of a smaller size stencil. These will include all of the original designs as well as the new releases. Available in sets of three coordinated designs. 

Did you see anything that just makes you want to create something?  Inspiration is everywhere.  It is wonderful to see what all those creative souls make with the tools and materials. 

I will wrap up my favorites from CHA with my one more post. Hope you will join me. 

Happy Creating!  Have a JOYfull day. 

Hugs, Sharon


Sunday, December 20, 2015

Oh Christmas Tree Cards

Happy December!

Really, it's almost Christmas?!  I have missed sharing my creations with you but just wasn't able to. More on that in another post. Today I want to share some Christmas cards with you. I have been having a festive time with the new Tim Holtz Sizzix dies Evergreen and Woodlands. Oh Christmas Tree!  Such versatile dies!

Wanting to keep things simple and quick, I used the Yuletide paper pad for the snow and the background. Metallic Kraft Core cardstock was used for the words and accents.  I used texture paste to create the snow on the trees as well as flicks of white picket fence paint to give the feel of snow fall. 


One last card is a steampunk, masculine Christmas for a friend in the construction industry. I used the same Yuletide paper pad and the metallic Kraft core. This time I embossed the copper metallic with the blueprint texture fade and sanded and inked it for a grungy feel. 


Do you want to see a sneak peek of my next class at Chico Scrapbooks?  It has a love/Valentine theme and will be on Sunday, January 17th after we get back from CHA.

These tiles are inspired by Paula Cheney. Check out her tutorial on her blog One Lucky Day http://www.oneluckyday.net/2015/12/star-bright-tree.html


Thank You so much for visiting my blog. I appreciate all those who stop by and all the wonderful comments. I appreciate each and everyone of you!  Wishing you a wonderful holiday season filled with blessings, joy, and love!

While I have been missing here on the blog I have been posting to my Facebook page SY's Studio. Please come on by if you are on Facebook. 

Happy Creating!

Hugs, Sharon


Thursday, July 30, 2015

Compendium of Curiosities 3 Challenge, #33

Hello,

can you believe we are almost to the end of the CC3 Challenges?  It has been fun to play along and I have enjoyed learning some new techniques along the way.

Challenge #33 is all about Altered Surfaces.

Those who play along by submitting a project using the technique and visit each Curiosity Crew team member's blog and leave a comment will be eligible to receive a great assortment of Tim's products courtesy of Tim and Mario if they are selected as the Curiosity Crew's Choice.

This challenge is sponsored by Inspiration Emporium and one lucky winner will receive a $50 gift certificate to shop at their fabulous online store.  Be sure to visit Inspiration Emporium and check out the amazing selection.

I know I always say this but this technique is fun.  Great grungy fun!  The possibilities are endless and can be adapted to any project.  I was so inspired by the Curiosity Crew's projects and amazed at the variety.  Be sure to visit Linda Ledbetter's blog, Studio L3 to see the projects and get more details on the challenge.

I worked in my Dylusions large journal for this challenge and got a chance to play with the newly released Crazy Birds dies.  Oh what a joy!  These crazy birds just make me smile.


Cute, huh?  I decided that these crazy birds needed a neighborhood!  Their houses are created with Tim's Artful Dwelling die and some scraps of Tim's paper.  I used the challenge technique to create the house numbers.


One of my favorite things was that I could color coordinate the house number with the color of each bird.  Hee hee hee!  Oh its the little things, right?


The page was finished off with an appropriate sentiment.


I've really been enjoying playing in my art journal this year.  Such a great way to play with my inks, paints, stamps and dies.  Looking forward to the accessories stamps for these crazy feathered friends.

Thanks so much for stopping by.  Hope you love these birds and their color coordinated houses as much as I do.

Happy creating!

Hugs, Sharon