Sunday, December 20, 2015

Oh Christmas Tree Cards

Happy December!

Really, it's almost Christmas?!  I have missed sharing my creations with you but just wasn't able to. More on that in another post. Today I want to share some Christmas cards with you. I have been having a festive time with the new Tim Holtz Sizzix dies Evergreen and Woodlands. Oh Christmas Tree!  Such versatile dies!

Wanting to keep things simple and quick, I used the Yuletide paper pad for the snow and the background. Metallic Kraft Core cardstock was used for the words and accents.  I used texture paste to create the snow on the trees as well as flicks of white picket fence paint to give the feel of snow fall. 


One last card is a steampunk, masculine Christmas for a friend in the construction industry. I used the same Yuletide paper pad and the metallic Kraft core. This time I embossed the copper metallic with the blueprint texture fade and sanded and inked it for a grungy feel. 


Do you want to see a sneak peek of my next class at Chico Scrapbooks?  It has a love/Valentine theme and will be on Sunday, January 17th after we get back from CHA.

These tiles are inspired by Paula Cheney. Check out her tutorial on her blog One Lucky Day http://www.oneluckyday.net/2015/12/star-bright-tree.html


Thank You so much for visiting my blog. I appreciate all those who stop by and all the wonderful comments. I appreciate each and everyone of you!  Wishing you a wonderful holiday season filled with blessings, joy, and love!

While I have been missing here on the blog I have been posting to my Facebook page SY's Studio. Please come on by if you are on Facebook. 

Happy Creating!

Hugs, Sharon


Thursday, October 22, 2015

Halloween House

Hello,

I have been having fun with Halloween home decor pieces this year. I got my hands on the new Tim Holtz Village Dwelling dies and I'm in love. These houses are easy to put together and personalize to any season or occasion. You know I had to do a Halloween house!

I was so excited to make my house that I didn't get any stepped out photos!  Here are some finished shots. 

I used the Tim Holtz Regions Beyond paper stash, some Idea-ology with a touch of glitter and sequins.


These ghosts were the perfect size for the house. This is one of the original yellow Sizzix dies I've had in my stash for a long time. Love it when I can combine my old dies with the new ones.  


My Hero Arts web stamp works to decorate the sides of this spooky house. 


Some detail shots. 


I cut a hole in the base before gluing the house down. This makes it easy to put a tea light under the house for extra frightful effects. 


This Village Dwelling XL die is the basic house. Two other Bigz dies were introduced to transform this one into a church or school house and a winter dwelling. Perfect for creating a winter or Christmas village.  The possibilities are endless.  Really. It's all up to your imagination. 

Thanks for stopping by. Hope you get time to create your own spooky Halloween home decor pieces. There is still time!

Happy creating!

Hugs, Sharon


Thursday, October 1, 2015

Hope and Awareness

Happy October,

Here in the US October is designated as Breast Cancer Awareness month.  This is a subject near and dear to me as I am a breast cancer survivor.  Regular screenings are so, so important.  I had no symptoms but thankfully it was caught during my annual mammogram.  No excuses ladies!  Saying that it hurts or that you don't want to get squished or that you don't have time are nothing compared to having cancer and going through treatment.  A momentary discomfort is nothing compared to the pain and effects from surgery, chemo, and radiation that last much longer.  If your screening location is not caring, respectful, and gentle then find another location. No excuses!

If you haven't gotten your exam this year make your appointment today!   If you have then good for you for taking care of yourself. Spread the word to all your family and friends!

Shout out those who are currently battling breast cancer and those who fought with bravery. Hugs to all those survivors who are not just merely surviving but thriving!

I'll leave you with a piece I did in 2012 during the early part of my recovery.   It's a reminder to enjoy the present, take the time to take care of you, and keep those dreams in your heart. 


Hugs!

Sharon


Monday, September 28, 2015

Watercolor with Distress Inks

Hello!

Today I'm sharing some quick and easy cards.  These watercolor cards take little effort but have wow results.  I am not a practiced watercolor painter nor do I have watercolor paints. After doing a little studying on some basic, and I mean basic techniques, I pulled out my Distress Inks and practiced some card fronts.  After doing a few test cards I was getting results I felt comfortable with.   With practice you too can get wonderful results. 

Here is the finished set of cards.  


I was having so much fun I didn't get any stepped out photos. The same steps were followed, modifying  a bit for different images. 

The tools I used included a non-stick craft mat, Distress Inks, two cups of water (one for clean water and one for dirty water), a variety of brushes, and a spritzer tool. I did not use a heat tool-I let all the cards air dry so the Distress inks could do their happy mixing thing. 

1.  Start with a good, heavy weight watercolor paper - I prefer cold press for its texture
2.  Pick out stamps that have open images or those with sentiments
3.  Heat emboss with clear ink and black embossing powder
4.  Use a brush to apply "clean" water to the card base
5.  Apply Distress Ink to your mat
6.  Wet your brush (again with the clean water) and dip into the ink and apply to your image
7.  Always clean your brush after each color (this will be your "dirty" water cup)
8.  Apply clean water for a watered down effect or to move the inks
9.  Apply more ink with less water on the brush for a more intense color
10.  Use white paint and a spritzer tool and markers to make some splatters for extra interest 

Practice is the key here to getting good results. You can do it. Pull out the watercolor paper or your art journal and make some watercolor art. 

Now some close ups of each card. 


Hope you start to look at your stamps and Distress inks in a new way. Would love to hear how your cards turn out!

Oh and where did I get those amazing fibers, you ask?  Why at Chico Scrapbooks. That Jodie has got some skills when it comes to selecting fibers and ribbons. Thanks for hooking a girl up!

Thank You so much for stopping by today. 

Happy Creating!

Hugs, Sharon


Friday, September 11, 2015

More Halloween Fun

Happy Friday to you!

Hope all is well and you are planning a fun weekend!  I have been busy working on class samples and designing some new projects. The spooky season is fast approaching and I have been having some more Halloween fun playing with the new Tim Holtz Skull die. 

I pulled out my hoarded Laboratorie Idea-ology Paper Stash, the Skull, and Postage Stamp Frames dies, some Ranger Texture Paste, and my favorite Halloween Distress colors and started playing. This will be my October class at Chico Scrapbooks. Here is a sneak peek.


If you are a Halloween fan like I am you will love this skull!

I'm looking forward to teaching a watercolor card class this Sunday at Chico Scrapbooks. It's watercolor Distress style. Love how versatile these inks are!  I got so caught up in making my samples I forgot to take photos. Ugh. I will take some on Sunday to share with you.   We still have seats for the class so if you are in the Chico area and are interested please call to reserve your spot. 

Headed back into the studio to finish up my skulls. He he he. Bwahahahahaha!

Check back to see the finished piece and a recap of Sunday's class. 

Thanks so much for stopping by. 

Happy Creating!

Hugs, Sharon

Wednesday, August 26, 2015

Halloween Fun with Graphic 45

Hello there!

I wanted to thank you for all the visits and comments on my mono print shadow box. Your support and sweet comments made my day and mean the world to me. 

Another Halloween project to share. This time I used the new G45 Rare Oddities.   Classic Halloween colors with some interesting and odd images. I used the small matchbox as my base to create a shadowbox wall hanging. 

It starts out as a dimensional hanging shadow box. 


With a surprise inside!


Did you spot the image from the first photo on the middle tag?  These three tags are linked with ribbon and attached to a clip to attach to the matchbox. They were created to be folded and stored in the box when not being displayed. This is not the best photo but this is so long it was a challenge to photigraph!


Here you can see the clip used to attach to the tags extender to the box. 


Close up views of the tags. 


I think this will look great hanging from the mantle to bring some spooky fun during the Halloween season.  Have you started any Halloween projects?  I'm really enjoying getting mine done early so that I will be able to enjoy them all season long. 

I posted this one on the Graphic 45 Facebook page for the August challenge. 

Thanks for stopping by.  Happy Creating!

Hugs, Sharon


Friday, August 14, 2015

Compendium of Curiosities 3 Challenge 34, The Grand Finale

Hello everyone!

Well, here we are at the final challenge from The Tim Holtz book, Compendium of Curiosities 3. What great fun it has been to play along. 

First, a huge thank you to Linda Ledbetter for hosting the challenges and for gathering such a talented curiosity crew to inspire us all.  Thank You to the Funkie Junkie Boutique and the Inspiration Emporium for sponsoring the challenges and provide generous shopping gift certificates to randomly selected winners. A big Thank You to Tim Holtz and Mario Rossi for providing great prizes for the Curiosity Crews Choice for each Challenge. 

To all of you who have stopped by to see my creations, and those that took the time to make kind comments I am so touched and thankful for your support. 

The final challenge is the Layering Stencil Monoprint technique on page 48. This is such fun and it's easy to get carried away with a desk full of backgrounds. 

I used the technique on watercolor paper and used it to cover a shadow box die cut from Tims postage die. 

This piece ended up on the back. 


Yup, it's a Halloween shadow box. I know, I know it's only August. I love creating home decor projects for Halloween and I am getting a head start on holiday projects. I pulled out my favorite Halloween Distress Inks and got in some frightful fun. 

The jack o lanterns and skull were stamped, inked and cut out. The spider and Happy Halloween are from the same mini Halloween 4 stamp set.   The script on the front and sides is from the new ledger script stamp set. Serious, mad love for this set!


Here are some close ups. 

A good shot of the script stamp. 


The spider is stamped in black archival and embossed with clear embossing powder. The words and bat are rub ons. 

The gum drops were colored with mushroom alcohol ink for an aged look. 

This will be a fun piece for the mantel or a shelf.  I had a great time creating this shadow box.  Hope you enjoyed it to. 

This final challenge of CC3 is sponsored by The Funkie Junkie Boutique.  One lucky winner will receive a $25 gift certificate. Tim and Mario will be providing prizes for the Curiosity Crews choice. Be sure to jump over to Linda Ledbetters blog to see what the crew did as well as those who played along too. 

I admit I'm going to miss these challenges. Hoping there will be. Compendium 4 so we can do it all over again. 

Thanks for stopping by. Happy Creating. 

Hugs, Sharon


Thursday, July 30, 2015

Compendium of Curiosities 3 Challenge, #33

Hello,

can you believe we are almost to the end of the CC3 Challenges?  It has been fun to play along and I have enjoyed learning some new techniques along the way.

Challenge #33 is all about Altered Surfaces.

Those who play along by submitting a project using the technique and visit each Curiosity Crew team member's blog and leave a comment will be eligible to receive a great assortment of Tim's products courtesy of Tim and Mario if they are selected as the Curiosity Crew's Choice.

This challenge is sponsored by Inspiration Emporium and one lucky winner will receive a $50 gift certificate to shop at their fabulous online store.  Be sure to visit Inspiration Emporium and check out the amazing selection.

I know I always say this but this technique is fun.  Great grungy fun!  The possibilities are endless and can be adapted to any project.  I was so inspired by the Curiosity Crew's projects and amazed at the variety.  Be sure to visit Linda Ledbetter's blog, Studio L3 to see the projects and get more details on the challenge.

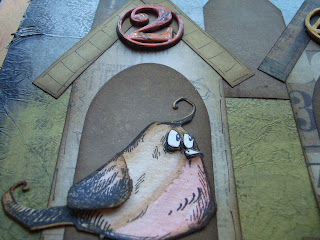
I worked in my Dylusions large journal for this challenge and got a chance to play with the newly released Crazy Birds dies.  Oh what a joy!  These crazy birds just make me smile.


Cute, huh?  I decided that these crazy birds needed a neighborhood!  Their houses are created with Tim's Artful Dwelling die and some scraps of Tim's paper.  I used the challenge technique to create the house numbers.


One of my favorite things was that I could color coordinate the house number with the color of each bird.  Hee hee hee!  Oh its the little things, right?


The page was finished off with an appropriate sentiment.


I've really been enjoying playing in my art journal this year.  Such a great way to play with my inks, paints, stamps and dies.  Looking forward to the accessories stamps for these crazy feathered friends.

Thanks so much for stopping by.  Hope you love these birds and their color coordinated houses as much as I do.

Happy creating!

Hugs, Sharon