Hope you are having an enjoyable day. With the first day of Fall in less than a week I wanted to share a home decor project that will take you through fall, Halloween , and into Thanksgiving. Love a home decor piece that is versatile, don't you?
This piece, really pieces, was left over from another project. Some 2 x 4 pieces already cut into 4, 5, and 6 inch high pieces. No stepped out photos on this one but I will walk you through the steps and list all the materials at the bottom of this post.
As is my usual method I didn't have a specific end result in my mind but knew I wanted a Halloween decor piece. Out came the Halloween colors, stamps and dies. I ended up with this group of Halloween blocks.

Fun, right? I started by painting the blocks all over with black gesso.

Once dry I applied some Ranger Texture Paste Transparent Matte through a spider web stencil. I let the paste air dry and then pulled out some Tim Holtz Distress paints in oranges. I dabbed on and blended with a baby wipe. This was repeated until I was happy with the color. I applied this color to all sides except the bottom. A happy surprise is how the matte paste makes the wood look like it carved! Next I die cut a variety of Halloween images and words. Some shading was added with Distress inks. The die cuts were glued down with Ranger Matte Medium. Some were given extra texture with some crackle paint. The final touch was some stamping of spiders and script on the sides and back. To protect the blocks I added a layer of matte medium over the whole surfaces.


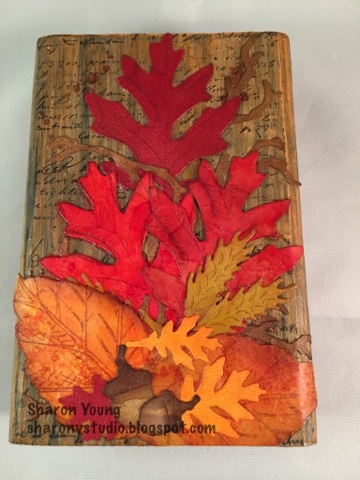
It was at this point that I realized that I could add more die cuts on the back side! Thus the Fall side of my blocks were born. I started the process again with some Fall themed dies, stamps, and inks. Side two turned out like this.

I did not include the "wood carving" on this side but instead used the same script stamp as used on the sides for the background. I followed the same process to color and glue on the Fall leaves and foliage die cuts. Again, the final layer was matte medium to seal everything up to protect and provide long wear.


I will display these blocks on a shelf in my great room on the Fall side. Some time in October I will flip them to the Halloween side. After October 31st I will flip them back to the Fall side and display through Thanksgiving. Three little blocks will cover the months of the Fall and Autumn holiday season.
Hmmmm, now I'm thinking it would be fun to have a set of blocks for each season! Winter/Christmas, Spring/Easter, and Summer/4th of July. I've got the pastes, paints, inks and die cuts so now all I need is hubby to help me cut up some 2 x 4s!
Hope this inspires you to look at scrap wood in a whole new way!
Supplies used:
Surface: Scrap wood 2 x 4
Wet: Distress paints, and inks in oranges, reds, yellows and browns; archival ink, black gesso, Ranger Matte Medium, Ranger texture Paste Transparent Matte
Dies: Tim Holtz Sizzix Tattered Leaves, Layered Leaf, Jack O Lanterns, Halloween thinlit word, Branch Tree, Mini Owl & Crescent Moon Mini Movers and Shapers, Autumn Gathering Sizzlet; and an original Sizzix die Pumpkin (38-0254)
Stencil: Tim Holtz Stampers Anonymous Shatter
Stamps: Tim Holtz Stampers Anonymous Ledger Script and MiniHalloween 4
Thank You for stopping by! Happy Creating!
Hugs, Sharon