Tuesday, October 30, 2012

Finger? Toe?

Finger?  Toe?  That is the cry that will be heard at my office on Halloween.  It has become my tradition to walk around the office with a tray of fingers and toes offering them to my co-workers.  Some smile, some laugh, then wrinkle their nose a bit, and grab a finger or a toe and munch down.  Most come back for at least one or two more.  Bwahaha!   A macabre Halloween ritual?  Yikes!

Before you start thinking I have gone off the deep end, I did forget to mention one detail.  These are finger and toe cookies!   Bwahaha!  Ha Ha Ha.  Trick or Treat!


The green ones are fingers and the white ones are toes, hee, hee, hee.


This started quite a few years ago when I saw a Martha Stewart recipe for witches hands made from sugar cookie dough.  I did those the first year but decided that was too much work and decided that just the fingers would be cool.  At first I didn't dye them green and some came out fat and thus the toes were created.  

You can use any sugar cookie recipe and just add some extra flour (about 3/4 to 1 cup) so that the dough is a little crumbly.  The trick is to get them the right consistency so they don't flatten out when baked.  I usually do a test bake with one finger to make sure I have it right.  To make things easier I usually just buy the prepared dough and add flour and food coloring.  Then you roll them into a log shape and pinch and press in the middle to form the knuckle.  The knuckle wrinkles are created by cutting some slices on the bump/knuckle.  Insert a sliced almond for the finger/toe nail and you are ready for baking.  I like to bake them for 11-12 minutes at 350 degrees.


Here's a closer look.

Hope you give these a try!  The fingers and toes are a great addition to any Halloween gathering.

Thanks for stopping by.  Have a safe and happy Halloween!

Sharon

Sunday, October 28, 2012

Witch Way

Happy Sunday.

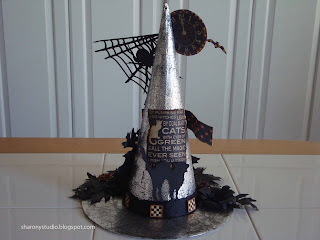
I've been working on one more Halloween project before the witching hour has passed.  I just can't seem to get enough of the faux metal look inspired by Tim Holtz.  This time I took my cue from The Gentleman Crafter.  He made this awesome  Silver Skull Crypt.  I used the same squiggly technique on the foil tape to get a fun texture.

I put them foil tape all over a witch's hat to make it look like metal.  Next came the flowers.  Using black cardstock and Graphic 45 Happy Haunting paper I made a bunch of flowers in all sizes.  Added to that were some leaves cut from the Sizzix Tim Holtz Tattered Leaves Die in black card stock.  These got wet and dry embossed.  I also cut out some shapes from my Teresa Collins Cricut cartridge Chic & Scary.  I layered and layered and am quite happy with the result.

Here is the front.


Here is the back.


Close up of the flowers and leaves.  You can seek peeks of the faux metal.


Close up of the moon, spider and web.


Witch way do you like it best?  Front or Back?

Off to start thinking about carving some pumpkins and making some witch finger cookies.  Happy Haunting!

Thanks for stopping by.  Hugs,  Sharon


Thursday, October 25, 2012

Halloween Fun

Almost time for Halloween!  So much inspiration and some cool techniques for making spooky fun creations.  I fell in love with the faux riveted metal look by Tim Holtz .  Was blown away when I saw  Steampunk'n! by Shelly Hickox.  Knew I had to try it when I saw The Gentleman Crafter's Jacked Up Jack-O-Lantern.

I wanted to put my own twist on it so I got the idea that I could alter this nice scarecrow guy.


So cute and happy, huh?

Wellllllll . . . .

when I got done with him, he was . . .


kinda creepy!  

We have affectionately named him creepy dude at our house.  He has the Tim Holtz faux riveted metal look on his face and his heart.  Various nuts and fittings for his eyes, nose and mouth.  Copper wire for his hands, feet, and hair.  A nice collar of leaves and that faux metal flower on his hat just softens him right up.  Not!

So much fun to make!  I love him and I hope you do to.  You've still got time to make your own creepy Halloween stuff.

Happy Crafting.  Thanks for looking.

Sharon

Wednesday, October 24, 2012

First Blog Post - Welcome!

Well, I guess technically its my second blog post ever.  Ha, Ha.  Welcome to SY's Studio!  This is my space to share my art and crafty creations along with some fun and laughs.  I hope that this blog brings joy and inspiration to others.  Thank You for stopping by.  I will be posting some of my latest projects so please be sure to come again.

Sharon Y

Under Construction

Come back soon to see my first blog post ever!