Tuesday, December 24, 2013

Tim Holtz 12 Tags of 2013 December

Merry Christmas!

Wishing you joy, laughter, and love this season and for 2014.  Hope that you are spending the holiday doing what makes you happy.

Hubby and I are staying home for Christmas as this is a busy time of year for me at my pay the bills job.  We spent a few days last week with family for an early celebration.  Right now I'm hanging in my craft room playing with my inks, papers, dies, and paints.

Thank You so much to all of you!  I appreciate your support and comments.  Each one means a great deal to me.  Thank You for letting me share my passion with all of you.  Looking forward to another creative year in 2014.

Ah, the final Tim Holtz tag for 2013.  Wow, what a cool technique!  Check out Tim's tag and tutorial here.  I have had a great time creating my versions of his tags.  Hope you have enjoyed them too.

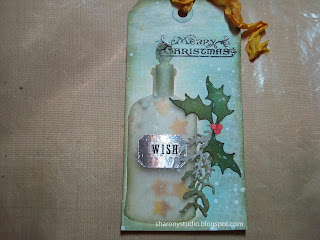
I don't have the Tattered Poinsettia die so I used the Apothecary Bottles die instead.


I inked up the bottle with Wendy Vecchi Archival Ink in Fern Green and Cornflower Blue.  Very subtle color but I love that it looks like a real glass bottle.  


My background is a combination of Distress paint, ink, and stencils.  The bottle label is foil tape with a rub on.  I inked a left over piece of a manila tag with ink and stain and punched out some stars which are "inside" the bottle.


The Merry Christmas sentiment is also a rub on.  The bottle and stopper were glued down with glossy accents.


The Festive Greenery Sizzlits Decorative Strip was used to cut out some accents.  I used white core'dinations card stock and inked with Distress Ink.


The final touches included flicking some white paint all over, and inking up some crinkle ribbon to match the stars.


Supplies Used:

Dry Media:  Ranger # 8 Manila Tags, idea-ology Frosted Film, Studio 490 Clearly for Art Modeling Film, idea-ology Crinkle Ribbon, idea-ology Remnant Rubs - Christmastime, foil tape

Inks:  Wendy Vecchi Archival Ink in Fern Green and Cornflower Blue, Tim Holtz Distress Inks in Tumbled Glass, Broken China, Forest Moss, Iced Spruce, Festive Berries, Wild Honey, Mustard Seed, Vintage Photo, Tea Dye, Tim Holtz Distress Paint in Picket Fence, Tim Holtz Distress Stain in Antique Bronze

Dies:  Apothecary Bottles (658715), Festive Greenery (657467)

Tim Holtz Stencils:  Dot Fade (TH006), Burlap (TH007)

Other:  EK Success star punch, paint brush, blending tools and foam


Ho, ho, ho!  Enjoy your festivities!  Thank You so much for stopping by and commenting if you so wish.

Happy Creating!

Hugs, and Merry Christmas,

Sharon


Wednesday, December 18, 2013

Boxes and Graphic 45

Good Evening!

Just a week to go until Christmas. Are you ready?  Hope you are finding time to enjoy the season. 

Boxes and more boxes. The paper mâché boxes that you can pick up from your local craft stores make a great jumping off point for some festive Christmas projects and gifts. Throw in some Grapgic 45 papers, some glitter and embellies and in no time you have a one of a kind home decor piece, a gift box or a wonderful hostess gift. 

The first set of boxes is for a class that I recently taught at Chico Scrapbooks. Using the yummy Graphic 45 Twelve Days of Christmas we decorated a set of nesting paper mâché boxes. The lids were topped off with some clear glitter. So sparkly and festive. 


On my sample I cut 1 x 1 squares to cover the sides of the boxes to look like tiles.  The ladies in my class started with my ideas and then made it their own. I love it when that happens. It makes me happy that others get inspiration from my projects and take it somewhere else. I unfortunately did not take any photos during the class so I can't share their creations. Note to self:  remember to take photos during class!

Here are some additional photos of my sample boxes. 


The second project I'm sharing is a small square paper mâché box covered with Graphic 45 Typography. I have a group of friends that has been gathering at my house every three months to work on a craft project. Everyone had a blast putting together their box.   We painted the boxes and then covered with the paper. A semi opaque medium was used as a glue and a sealer which gave a white washed effect. Didn't they do a great job?!


Each box is unique and reflects the personality of the creator. Thanks ladies!  It is so wonderful to spend time chatting, crafting, laughing, eating, and enjoying good company. 

If you are looking for a last minute gift or home decore piece why not try a pre made box covered with your favorite paper. So many possibilities!

Thanks for stopping by. I love it when you do and even more when you make comments. Happy creating!

Hugs, Sharon


Wednesday, December 11, 2013

Christmas Gift Card Holders

Good Evening Everyone!

Hope your week is going well.  Just two short weeks until Christmas.  Just seems that December goes by at the speed of light doesn't it?

Got all your shopping done?  For the most part I do.  Hubby and I are keeping it simple and giving gift cards and home made gifts.  Now you can't just hand over the gift cards right?  There has to be something to hold the cards and make a festive presentation.  I created some cards that have a gift card holder on the inside that I wanted to share with you.

Using the Alterations dies Postage Stamp Frame and Mini Clipboard I put together a fun holder for those gift cards.  These came together quickly.  I used some Christmas paper from seasons past from my stash.  If you have these dies and some left over Christmas paper this is something that you could easily put together without much effort.


The card base and envelope are blanks that can be purchased at your craft store.  Usually come in packs of 50.  I keep these on hand so I can put together cards quickly if needed.  The papers, from my stash, are from K&Company (Tidings of Comfort and Joy by Brenda Walton) and SEI (Winter Song).  I used the sentiments from the paper collection.  Just basic measuring, cutting, layering, and gluing here.


The inside starts with a base of more paper from the collections.  Next is the die cutting.  I used the two dies together - the Postage Stamp Frame and the Mini Clipboard.  


If you are unfamiliar with Movers & Shapers dies from Tim Holtz Alterations line they are a versatile group of dies.  The base movers & shapers like this Postage Stamp Frame has a center cut out that can be used as is or you can insert shapes to create cut outs.  In this case I used the Mini Clipboard to create a holder for the gift card.  I inked up the edges of the postage frame and used some pewter distress stain to color the top of the clipboard.  Fun isn't it?


If you are looking for a festive and unexpected presentation for your gift cards this year the mini clipboard is it!  Lots of options to use the clipboard with many of the base movers & shapers die to make a card or tag.

I hope that you are taking the time to enjoy the season.  Stop and have some cookies or a hot chocolate and admire your tree or take some time to drive around and see the Christmas lights.  

Thank You for stopping by.  Happy Creating!

Hugs,  Sharon


Saturday, November 30, 2013

Tim Holtz 12 Tags of 2013 November

Hello, I'm back again.   It dawned on me that it is the last day of November and I hadn't played along with Tim Holtz on the 12 tags of 2013 November.  This month Tim did a chalk board tag.  Check out his version here.

Tim used a matte finish embossing powder but I didn't have any so I just pulled out the white embossing powder out of my stash.  It's a bit shiny but I'm happy with the results.

I did one tag with the gingerbread man and candy from the mini blueprints 5 stamp set (CMS170).  The other was a gift tag using the Christmas Time stamp set (CMS141).


Here are some close up details.


And, a bit of different angle where you can see the popped up shapes.


This one was fun.  Do I say that about all the tags?  Well, yes I think I do, ha ha ha.  Looking forward to seeing what Tim creates for December.

Thanks for stopping by.  Hope you are getting some crafty time.  Happy Creating!

Hugs,  Sharon


Thankful and Carry On

Happy Saturday Friends!

hope you have spent your Thanksgiving weekend surrounded by family, friends, and some good eats!

I just wanted to take this opportunity to let you know how thankful I am for all of you!  It is an honor and a pleasure to be able to share my creative pursuits with you.  I appreciate all those who stop by, make comments, and support me.

We are having some unusually warm and dry weather in Northern California.  I got to spend a little time out in the yard trimming and picking up leaves.  Always makes me feel better to putter around in the yard.

I've got several projects in the works.  One is a card for a friend.  It is a take off on the British saying Keep Calm and Carry On.  I put my own twist on the phrase.


I stamped and inked some book paper for the front of the card and some Basic Grey ledger paper for the inside.


Big Ben was popped up and accented with some glossy accents.


To cover the inside sentiment as a surprise I made a pocket with some coredinations card stock embossed with the TH clocks texture fade and inserted a postcard in the pocket.  I wrote my personal birthday wishes on the postcard.


Inks and supplies used included:


Fun card isn't it?  I had a blast making it.  Hope you give it a try.  Well, I'm off to work on some gift card holder Christmas cards.  Check back again to see what I'm creating with some movers and shapers dies.

Hope you get some time this weekend to craft and create.  Happy crafting!

Hugs,  Sharon


Wednesday, November 20, 2013

Grungy Wall Hanging Full View

Hello, me again!  If you remember from my post a couple of days ago I shared a wall hanging I created for YaYa's birthday but failed to get a full view shot.  Well thanks to Linda (aka YaYa Ladybug) who posted pics on Facebook I was able to snag a full view photo.


Enjoy!  Thanks for stopping by, again, ha ha ha.  Have a wonderful evening!

Hugs, Sharon


We have a winner!

Hello Friends,

we have a winner for my one year blog anniversary giveaway as selected by the Random Number Generator.


Random Sequence Generator

Here is your sequence:
2
1
4
3
Timestamp: 2013-11-21 03:36:08 UTC

Wendy, you were the 2nd to comment.  Congratulations!  Please email me at b4joy2day@gmail.com with your address and I will get that Ranger apron and Heidi Swapp Christmas album shipped to you.

Thanks to everyone for your support and comments.  That means so much to me.  I am so thankful for all the friendships I have made in the last year or so through crafting.  Some of you right here close to home and others from all around the world.  It's amazing that technology has brought us together.

Thanks for stopping by.  Happy Creating!

Hugs,  Sharon


Sunday, November 17, 2013

Blog Anniversary, Latest Projects, and a Giveaway!

Hello Friends!  Life is good.  Just spent yesterday at Chico Scrapbooks for a Thanksgiving crop with some of my best crafty buds.  Today I'm just hanging out at home.  Feeling very productive today.  A little cleaning, a little baking (some Tamari almonds and chocolate chip cookies, yum!), and now some crafty time.  Ahhhhh, aren't Sundays great?!

I've got  a lot to share today so this is photo heavy.  So grab a cuppa, sit back, and get caught up on SY's Studio.

I missed celebrating a milestone with my blog.  It's been a year since I jumped into the world of blogging and social media with SY's Studio.  Wow, what a fun year its been.  My first blog post was October 24, 2012.  Thank You to all of you who have followed me here and on my Facebook page and to those of you who have stopped by.  I feel very blessed to be able to share my creative pursuits and that you support me.  I can't say thank you enough!  To commemorate this blog anniversary I am doing a give away.  Yay!  Love give aways.  Don't you?


How about a Ranger apron and a Heidi Swapp Christmas memory files album?  To be entered in the giveaway please leave a comment on this blog with your favorite post or project so far and what you would like to see more of.  I will choose a winner on Wednesday,  November 20, 2013.  Good Luck!

Things have been busy here in the North State.  I've got several classes coming up at Chico Scrapbooks which include making samples and kitting.  Lots of cutting, die cutting, and prep.  On Friday I will be teaching a Thanksgiving Place Card class.  I was able to do a demo yesterday at our crop.  Nothing better than seeing the look of joy on peoples faces when they see a new technique or learn how to use a product they already have in a new and different way.  The placecards are created using Sizzix dies and embossing folders and a whole lot of Distress inks.


I recently finished a wall hanging for a dear friend who had a birthday this month.  Happy Birthday YaYa Lady Bug!  So happy that you like your present!

This wall hanging started with the cardboard from the back of a watercolor paper pad.  As I was reaching to put it in the recycle bin it turned upside down and I had the inspiration to use it for a wall hanging.  I pulled out the Tim Holtz Idea-ology Tissue Wrap, my Tim Holtz stencils and Distress inks and paints and got busy. 

This is the watercolor pad cardboard turned upside down, wire taken out and painted with black gesso.

Tissue wrap applied.

Die cuts glued on.


Let the stenciling begin.


Another layer of distress paint.


Stenciled, inked, stamped, and ready for embellies.

Tattered florals.

Here are some shots of the finished hanging.  Sorry, I missed getting a full view shot of the whole piece,  but these details will give you the idea.


I'm also working on a mosaic box set for a class at Chico Scrapbooks in early December.  That one is not ready for a reveal just yet but I will be posting some photos soon.  It will make a great Christmas gift filled with goodies or presents.

The winner of the anniversary giveaway will be picked on Wednesday so be sure to leave a comment on what blog post or project you like the most so far and what you would like to see more of.

Thanks so much for stopping by and your continued support.  Happy Creating!

Hugs,  Sharon