Tuesday, December 25, 2012

Joy-Tim Holtz 12 Tags of 2012 December

Merry Christmas all!  Wishing you joy and peace this season and for the upcoming year.

I'm happy to be getting some crafty time in today.  Earlier this year I set a goal for  myself to create tags and projects for two monthly challenges.  The Tim Holtz 12 Tags of 2012 and the Inspiration Journal monthly challenge.  It has been great fun and an opportunity to practice my newly found skills.

For December I was able to create one project that I can post on both challenges.  A joyful tag using one of my favorite inks Distress Broken China.

Using Tim's technique I created a background on a Ranger # 8 Manila tag using Distress Broken China ink and Brushed Pewter Distress Stain.  Additional distressing was achieved by spritzing some water on the tag.  I also distressed the edges and inked with Broken China.

I stamped Santa and his reindeer using the Stampers Anonymous Tim Holtz Christmas Time stamp set onto white cardstock.  Using Distress markers and a water pen I colored in Santa's face, coat and mittens as well as some highlights on the reindeer.  I also colored the buckle and bridle with Distress markers.  As a final touch I added some Distress Rock Candy Stickles on Santa's hat and coat.   I trimmed around the Santa image and mounted him to the tag with foam tape.
I stamped the joy in Archival Jet Black Ink and added some more of the Rock Candy stickles.  I trimmed around the stamped image and inked it with Distress Broken China.  I also created more of the background on a scrap piece of the white cardstock and punched out some snowflakes.  The snowflakes were glued to the bottom of the tag and the joy was mounted with foam tape.
I believe that Santa represents the spirit of Christmas so its fitting that I chose a Santa image for my joyful tag.

May you carry a little bit of Santa with you all year long.  Find the joy in giving.  Practice RAK's (Random Acts of Kindness).  Look for the magic.  Choose a Joyful attitude and outlook on life.  A positive spirit can be spread to all those you meet in your life.

Blessings all.  Thank You for stopping by.  Please leave a comment if the spirit moves you.  

Hugs,  Sharon

Materials Used in Joyful Tag:

Ranger # 8 Manila Tag
Broken China Distress Ink
Brushed Pewter Distress Stain
Tea Dye Distress Ink
Distress Markers - Broken China, Tattered Rose, Barn Door, Walnut Stain, Wild Honey
Archival Ink - Jet Black
Marvy Uchida Snowflake punch
Rock Candy Distress Stickles
Idealogy Crinkle Ribbon
Stampers Anonymous Tim Holtz Christmas Time CMS 141
Joy stamp by Printworks


Sunday, December 23, 2012

Tiny Little Books Revealed - Finally!

Happy day before Christmas Eve!  Really?  Is it really almost Christmas?  I've been a bad, bad blogger!  December feels like it went by in a second, ha, ha, ha.

About a month ago (again, really?) I gave you a sneak peak on some tiny books I had been thinking about for a long time and finally got them done.  If you are still with me today is reveal day.

These books are gift tag holders.  I wanted some small books that you can keep in a drawer or with your wrapping things to have some ready made tags available to attach to gifts.


The inside of each book has pockets to hold the gift tags ready for use at a moments notice.

I die cut a bunch of gift tags using Tim Holtz Sizzix mini tabs and tags die and another Sizzix tag die.   Then "to" and "from" was stamped on each one.  Some are just plain, others have more stamping or embellishments.  Various twine and string was tied on so they would be ready to attach to a package. 

I made tags for all year round including at least one for each major holiday.  Also made sure to include both feminine and masculine styles.  

It was fun to pull papers from my stash to make the covers and tags.  The tabs that hold the book closed are made using the same Sizzix tag die from grunge board and inked with Distress Ink to match the covers. 

These made great gifts for some of my best girlfriends and were received with rave reviews.  So nice to feel the love!

I have another recent project to share after Christmas.  It is a gift and I don't want to spoil the surprise.  Shhhhhh!

I hope that you are in the Christmas spirit and are making preparations for a wonderful holiday.  I got into the spirit by baking some cookies.

Merry Christmas!  Thank You for stopping by.  I promise it won't be so long in between blog posts!  Love to get your comments and appreciate you taking the time to do so.

Hugs,  Sharon


Monday, December 3, 2012

It's the little things-storage Tim Holtz style

Hello!  Sometimes it all about the little things that make us happy.  A favorite punch or stamp.  That perfect color of ink.  A sunny day, or a rainy day if that's your thing.  Today a simple rod and some hooks are making me very happy.  I have been re-organizing my craft room and wanted to share what is making me smile.

We crafters love to see how others are organizing their stuff.  I'm a huge Tim Holtz fan and regularly check out his blog.  A few years ago (2007 to be exact) Tim did some blog posts on his studio.  He has these industrial looking wire racks to hold all his tools and supplies.  Cool!  What really caught my attention was how he stores his ribbon.  A draw rod and some S hooks and it gives him easy access to the ribbon and looks festive and colorful.  Check out Tim's studio.

So excited to finally be able to set up this storage for myself.  Metal rack.  Check.  Had some in my old craft room closet but now I have room to display them to get that industrial feel.  S hooks.  Check.    Draw rod.  Huh?  What's a draw rod?  Well I discovered it is the rod that attaches to the fancy curtains to open and close them.  After visiting three stores and not finding a draw rod I put on my thinking cap and visited one of my favorite places in the do it yourself store.  The hardware aisle!  Yes,  you read that right the aisle with all the nuts, bolts, washers, and assorted cool doo-dads.  I love to pull open those drawers and check out all the stuff and imagine what I can build with it.  It just makes me happy.  Oh, ok I'm getting side tracked here, lol.

I found some threaded rods.  I have no idea what they are actually supposed to be used for but thought they would be perfect to hold the ribbon.  Why threaded?  I wanted to put a wing nut and a fender washer at each end so if I ever need to pull off the whole rod from the hooks they would keep the rolls of ribbon from sliding off.  Plus they just look cool and industrial.  Well, check out these photos and see for yourself.

Love how Tim threaded the ribbon through the rack.
Makes it easy to roll off what you need.  I added a yard
stick on another S hook to make it easy to measure.

On the side is a Ribbon Ring for the smaller lengths of ribbon.

Close up of the rod, wing nut, fender washer and S hook.

Still have lots of room for more ribbon!

I'm not quite ready to reveal the whole room but this last photo gives you a sneak peak of my first attempt at organizing the rack.  The black boxes are 12 x 12 photo boxes that I use to hold current projects in progress.  These make it easy to clean up between working sessions while still keeping all the supplies together.  The second shelf has some reference books, my pens, a tray with my punches, and a letter holder with my trimmer, scoreboard, and cutting board I use for embossing.

As I complete more of the room I will give you some peaks.  Please let me know if you have questions about anything you see or want to see more of something.

Oh, wanted to make sure I give credit to the creator of the Ribbon Ring.  Please check out their web site here for more info.

Thanks for stopping by.  Hoped you enjoyed the little thing that makes me happy!

Sharon


Thursday, November 29, 2012

A Little Reorganization

Hello!  I had hoped to reveal my mini books this week but have been delayed. I am lucky enough to be moving my studio into a bigger room in our house and it is not usable at the moment

It all started with two of our nieces moving in with us. We gave each of them their own bedrooms and so that left us with only one spare bedroom for my husbands office and my craft room. We made the decision to build a room in part of the garage so my hubby could have a proper office as he is self employed and works from home.

Which leads to me getting the second biggest bedroom in the house for my studio. Yippee!  So excited to make it my own. Using the same desks and storage that I have but configuring in a new way.

I'm hoping to have the room at least partially back together in the next day or two  so I can continue working on my mini books and other projects.

Stay tuned . . . .

Thanks for stopping by.

Sharon

Sunday, November 25, 2012

Fall Color and More

Happy Sunday!  What a wonderful start to the holiday season.  I had planned on posting on Thanksgiving but the day got away from me.  In fact the four day weekend has been so busy it just flew by.

First thing Thanksgiving I had to run out front and get some photos of the tree in our front yard.  The morning sun was making the leaves look illuminated.  Beautiful!  We are lucky here in Northern California to experience the fall colors.  What a blessing to see all the reds, yellows, and oranges on the trees at home and around town.


As I look at these photos I am reminded that I have a great many things to be thankful for.  My health, my husband, my family, my ability to craft and create, my online crafting family, a job in these tough economic times, and so much more.  I am grateful for you who take the time to read my new blog and make comments.  Wishing all of you many blessings this holiday season.

This will be a busy time.  So much fun stuff planned for the Christmas season.  I have quite a list of projects planned so I will share as much as I can.  Many gift items as well as home decor pieces.  Excited to see all the inspiration out there already.  So many talented artists who are generous enough to share their creations.

I will leave you with a sneak peak of some gifts I am making.  The idea for these has been rolling around in my head for quite some time so I am happy to be making good progress on them.  I will give you more details in a future post.  For now here is a quick look:


Hmmm, little tiny books.  What could they be?  Please come back and I will show you more.

Have a wonderful week and take time to enjoy the sights and sounds of the holidays!

Thank You for stopping by.

Sharon


Monday, November 12, 2012

Celebrating Gratitude

Happy Monday!  Hope your week is off to a good start.  As promised here is the other project using those same leaves and pumpkins from the Tim Holtz tag.

This months challenge at the Inspiration Journal is to celebrate gratitude by making a little something for each Thanksgiving guest.  I had thought to make treat boxes with some Close to my Heart pre-scored boxes that I have had in my stash forever.  Got them all inked up with Distress but once I folded and put them together they looked like little pyramids.  Not exactly the shape I had in mind.

Back to the drawing board.  I decided on a place card for each seat.  I knew that I wanted to include some leaves and those little pumpkins that turned out so cute but I needed a base and some way to stand it up.  The Alterations Hanging Sign was a perfect solution!  I cut two signs per place card out of old manila file folders.  One sign is for the place card and the second is for the stand.  The pumpkins and the banner were also cut out of manila.  I used kraft cardstock for the leaves.

I inked up the signs, pumpkins and leaves with a variety of Distress inks in fall colors.  The signs were embossed with a cuttlebug embossing folder.  Taking my inspiration from Tammy Tutterow's beautiful tag posted on November 6, 2012,  I used Distress crackle paint in clear rock candy to give a nice aged affect and inked the edges with Walnut Stain.  The pumpkins were inked with Wild Honey and Spiced Marmalade Distress ink.  I added the color to the stem and shading with Distress Markers.  A water brush was used to blend the shading and stem colors.  A spritz of water gave a cool effect.  These were edged with Walnut Stain Distress as well.


To make the place card I scored one of the signs (not embossed), folded in half and glued to the back of the inked and embossed sign.  I attached a pumpkin, and two leaves to each place card.  As the sign has holes to hang it I used the leaves to cover these.  The finishing touch was a banner hand cut from manila and stamped with a Hero Arts sentiment.

Pretty place cards to celebrate the gratitude we feel for our family and friends!


Supply List:

Sizzix Tim Holtz Alterations Tattered Leaves Die
Sizzix Tim Holtz Hanging Sign Die
Sizzix Pumkin Die (38-0254)
Cuttlebug Embossing Folder-Stylized Flowers
Distress Inks - Spiced Marmalade, Barn Door, Wild Honey, Walnut Stain
Distress Crackle Paint - Clear Rock Candy
Distress Markers - Tea Dye, Spiced Marmalade, Forest Moss
Glue N Seal
Hero Arts Clear Stamps - Celebrate Everyday

Thank you for taking the time to stop by and make comments.  I am grateful!

Sharon


Sunday, November 11, 2012

Tim Holtz 12 Tags of 2012 November

Good Evening,

hope you had a great weekend!  Mine was busy catching up with some work around the house.  I did manage to get some crafty time in today so I'm a happy girl!

I have started participating in the Tim Holtz 12 Tags of 2012.  Most of the time I don't have the exact tools and supplies that Tim uses so I improvise.  It's fun and a good challenge.  November's tag has a technique I've never used before and I'm pretty pleased with my first try.


I've got another project to show you that also uses the same leaves and pumpkins.  Will post that tomorrow.

Thanks for stopping by.  I really appreciate it and enjoy your feedback and comments!

Sharon


Monday, November 5, 2012

Fifty Things

Happy Monday!  Hope your week got off to a good start.  I'm happy to say that I have started working on some Christmas gifts.  More on that in another post.  Today, I really wanted to talk about birthdays.

This year is one of those big birthdays.  I, gulp, turned 50!  Did I say that out loud? Ha, ha, ha.  As I have been on a mini album making kick as of late I knew I wanted to create one to record my 50th year.  I was inspired by Keis on Scrapbook.com who did a 29 things album.  Thank You Keis for the great idea.

While I was making one for myself I made one for my cousin Kurt.  He is two months younger than I am and so he joined the 50 club last month.  I wanted to be able to capture likes, dislikes, dreams, and  inspirations at 50.  I chose places, people, dreams, change, and time as the themes for the list of 50 things.

I used one of my favorite paper lines from Graphic 45 called Olde Curiosity Shoppe.  The album, made of black policy envelopes, is also by Graphic 45.  Love, love, love this company and their papers.  These albums were a blast to make and I'm looking forward to making my list.

Photo heavy here.  Enjoy!
Here are the covers of the two albums


Here are the themed sections


An example the tags with the list


Smaller tags will be good for photos and memorabilia


The last pocket holds a photo folder


This album makes a great gift and could be adapted to any occasion.

Thanks for stopping by.

Sharon


Tuesday, October 30, 2012

Finger? Toe?

Finger?  Toe?  That is the cry that will be heard at my office on Halloween.  It has become my tradition to walk around the office with a tray of fingers and toes offering them to my co-workers.  Some smile, some laugh, then wrinkle their nose a bit, and grab a finger or a toe and munch down.  Most come back for at least one or two more.  Bwahaha!   A macabre Halloween ritual?  Yikes!

Before you start thinking I have gone off the deep end, I did forget to mention one detail.  These are finger and toe cookies!   Bwahaha!  Ha Ha Ha.  Trick or Treat!


The green ones are fingers and the white ones are toes, hee, hee, hee.


This started quite a few years ago when I saw a Martha Stewart recipe for witches hands made from sugar cookie dough.  I did those the first year but decided that was too much work and decided that just the fingers would be cool.  At first I didn't dye them green and some came out fat and thus the toes were created.  

You can use any sugar cookie recipe and just add some extra flour (about 3/4 to 1 cup) so that the dough is a little crumbly.  The trick is to get them the right consistency so they don't flatten out when baked.  I usually do a test bake with one finger to make sure I have it right.  To make things easier I usually just buy the prepared dough and add flour and food coloring.  Then you roll them into a log shape and pinch and press in the middle to form the knuckle.  The knuckle wrinkles are created by cutting some slices on the bump/knuckle.  Insert a sliced almond for the finger/toe nail and you are ready for baking.  I like to bake them for 11-12 minutes at 350 degrees.


Here's a closer look.

Hope you give these a try!  The fingers and toes are a great addition to any Halloween gathering.

Thanks for stopping by.  Have a safe and happy Halloween!

Sharon

Sunday, October 28, 2012

Witch Way

Happy Sunday.

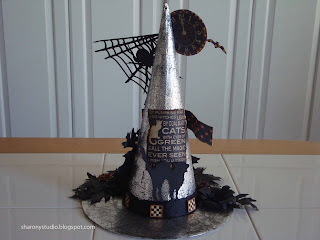
I've been working on one more Halloween project before the witching hour has passed.  I just can't seem to get enough of the faux metal look inspired by Tim Holtz.  This time I took my cue from The Gentleman Crafter.  He made this awesome  Silver Skull Crypt.  I used the same squiggly technique on the foil tape to get a fun texture.

I put them foil tape all over a witch's hat to make it look like metal.  Next came the flowers.  Using black cardstock and Graphic 45 Happy Haunting paper I made a bunch of flowers in all sizes.  Added to that were some leaves cut from the Sizzix Tim Holtz Tattered Leaves Die in black card stock.  These got wet and dry embossed.  I also cut out some shapes from my Teresa Collins Cricut cartridge Chic & Scary.  I layered and layered and am quite happy with the result.

Here is the front.


Here is the back.


Close up of the flowers and leaves.  You can seek peeks of the faux metal.


Close up of the moon, spider and web.


Witch way do you like it best?  Front or Back?

Off to start thinking about carving some pumpkins and making some witch finger cookies.  Happy Haunting!

Thanks for stopping by.  Hugs,  Sharon


Thursday, October 25, 2012

Halloween Fun

Almost time for Halloween!  So much inspiration and some cool techniques for making spooky fun creations.  I fell in love with the faux riveted metal look by Tim Holtz .  Was blown away when I saw  Steampunk'n! by Shelly Hickox.  Knew I had to try it when I saw The Gentleman Crafter's Jacked Up Jack-O-Lantern.

I wanted to put my own twist on it so I got the idea that I could alter this nice scarecrow guy.


So cute and happy, huh?

Wellllllll . . . .

when I got done with him, he was . . .


kinda creepy!  

We have affectionately named him creepy dude at our house.  He has the Tim Holtz faux riveted metal look on his face and his heart.  Various nuts and fittings for his eyes, nose and mouth.  Copper wire for his hands, feet, and hair.  A nice collar of leaves and that faux metal flower on his hat just softens him right up.  Not!

So much fun to make!  I love him and I hope you do to.  You've still got time to make your own creepy Halloween stuff.

Happy Crafting.  Thanks for looking.

Sharon

Wednesday, October 24, 2012

First Blog Post - Welcome!

Well, I guess technically its my second blog post ever.  Ha, Ha.  Welcome to SY's Studio!  This is my space to share my art and crafty creations along with some fun and laughs.  I hope that this blog brings joy and inspiration to others.  Thank You for stopping by.  I will be posting some of my latest projects so please be sure to come again.

Sharon Y

Under Construction

Come back soon to see my first blog post ever!